Struggling to get the results you want from your emails?
Discover 15 simple yet powerful ways to elevate your email marketing and start seeing real engagement!
Grab your freebie!
Blog Categories
Helping small business owners, virtual assistants, and creative entrepreneurs grow their business.
Hi, I'm Tara! I'm a multi-passionate business and marketing coach.
learn more + get a copy:
Writing a great blog post is one thing, but it doesn’t stop there. After you’ve written your blog post, you need to properly format it into your WordPress to look satisfying to the person reading it.
When you format your WordPress blog post, there are some basic steps you need to keep in mind. These steps will make reading your blog post more pleasurable for your audience, and it can also help you have a better SEO and rank higher on search engines.
Disclaimer: I earn from qualifying purchases. Some of the links on my website are affiliate links, which means, at no additional cost to you, I will earn a small commission if you click through and make a purchase.
Without further ado, let’s dive into the steps to format your WordPress blog post.
How to Format Your Blog Post in WordPress
There are two ways you can write a WordPress blog post; the 1st is to write it out in MS word and then paste it into WordPress and start formatting, and the 2nd is to write it entirely from scratch in WordPress. I prefer the first way. I write my post in MS Word, and then I format it in WordPress using the steps below. But it’s up to you how you would like to work.
Placing Headings
It’s important to have short paragraphs and break up your text instead of having one long text block. Placing headings is a great way of breaking up your text into small pieces and making it easier to follow.
Here are the ways you can place a heading:
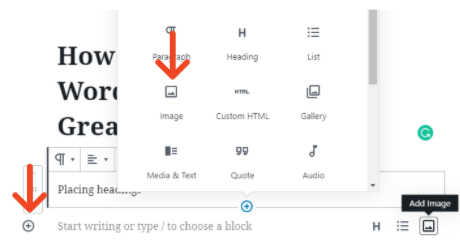
1 Select the text and choose the heading option. Choose heading 1 if it is the first subheading, heading 2 if it is the second, and so on.
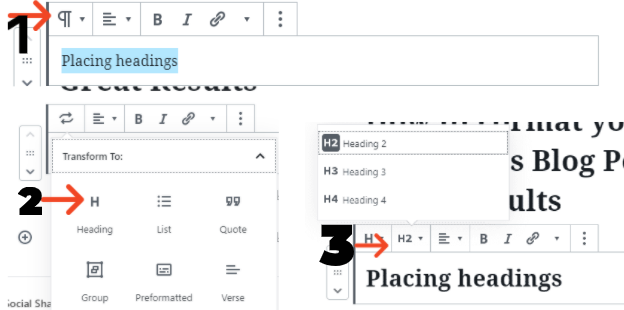
2 Press on the plus sign for new text and choose the heading option.
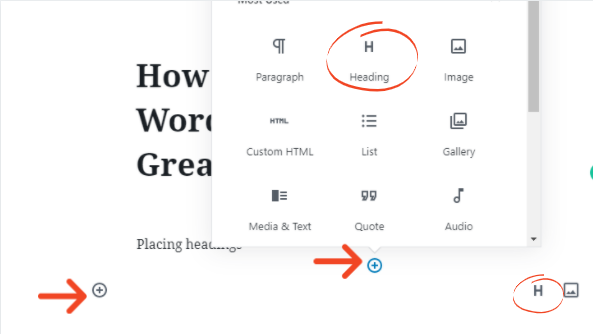
You can undo this by pressing the change block type or style button and choose what you would like to change it to.

Placing Lists in Your Text
Another way of breaking up text and making it more readable is by placing your text in lists. You can put numbered or bullet list.
Like the headings, you can also place lists in two ways.
1 By selecting the text and choosing which type of list you want. (See in the first image how to get the list option).
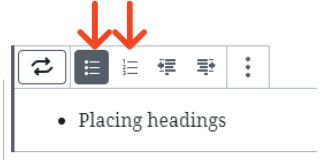
2 By inserting an empty list and start typing.
You insert the text by selecting the list after pressing the plus sign for a new block. (See image 2). When you work with a new empty list, you can get the following line by pressing enter.
Undoing this is the same as with the heading.
Emphasizing Text by Making it Bold or Italic
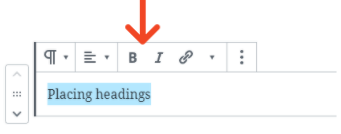
If you want people to pay more attention to a particular part of your text, you can emphasize that part by making it bold or italic, or maybe both.
You do this by selecting the text you want to emphasize and choose the option you like. If you want to undo that, just repeat the same steps.
Placing Images in Your WordPress Blog Post
Images can help illustrate your message and make your blog post more interesting to read. Make sure you place pictures that are catchy and are relevant to your subject.
You can find images you can use for free in your blog post on Unsplash or Pexels. But you can also create images with text in Canva.
You place an image in your blog post by pressing the plus sign for a new block and then select the image icon.
Inserting a HTML Text
You can use HTML text for several parts or reasons in your blog. I use them mainly to place my subscription forms. You can place these in the middle or at the end of your blog post as a call to action. Placing an HTML text is as easy as the steps mentioned above.
You can press enter and get an empty block, select the HTML option, and then you have an open HTML text box.
Or press the plus sign and choose HTML to get the empty box.
Placing Links in Your Text
One of the essential things that help your blog post have better SEO is having links, both internal and external links.
If you have written a blog post earlier that can serve as an extension of this current blog post, make sure you refer to that post, this is an internal link. But also, if you get your information from a reliable source, link back to that source, this counts as an external link, and Google loves that.
You can place a link in your text simply by selecting the text and then clicking the link option.
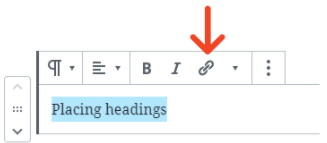
After that, insert the link and press the enter sign.

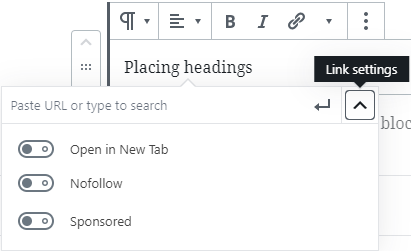
You can then choose in the link settings if you’d like for the link to open in a new tab or not. There are also other options like making it a nofollow link.
Formatting the URL of The Blog Post Before Publishing
Before hitting that publish button for your blog post, make sure to check if your blog post URL is not too long. I have the Rank Math plugin, which gives me many tips about my blog post structure and SEO, and advice about the length of my blog URL is one of them.
The URL will automatically be formed when you save the blog post as a draft. The URL will be made by the title of your blog post.
Here’s how you shorten it. Click on the settings icon on the right of your window, then click on the document tab. Scroll down until you see the URL slug. There you can adjust your URL.
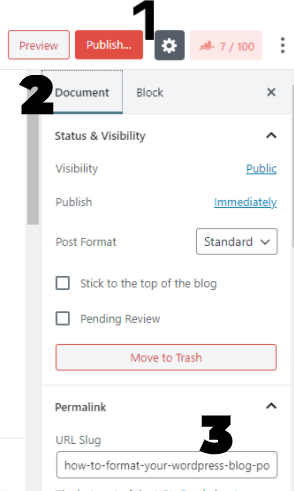
Make sure that your short link still consists of your blog post’s main point and that your keywords are in it.
Placing a Featured Image
A featured image is essential for a blog post. A featured image is a representation of your blog post. Whenever you or someone else share your blog post link somewhere, the featured image will be seen as well.
It also helps when someone is going through your website, and you have a catchy featured image. Even if the person does not read the blog post title, you can grab their attention with the featured image.
Here is how you place your featured image. When you’re in the document tab from the settings, which I mentioned before, scroll further down till you see the featured image section. If you click on it, you’ll be able to select an image you had already uploaded, or you can upload a new image.
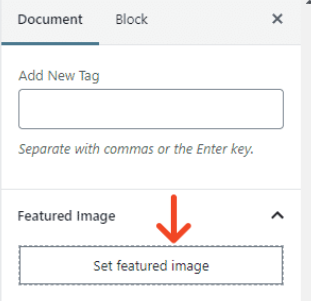
You can also add an additional featured image if you want another image to appear if you share your post on Facebook, for example. To do this, you need to upload that image in the social tab of your blog post. I’ll discuss this under the next point.
Editing Your Social Media Snippet
The text in your social media snippet gives a short summary of what your blog post is about. It’s the text people see when your post appears in a social search, but also if you would share it on Facebook, for example.
Make sure you place some relevant keywords in your snippet. This also helps with your SEO.
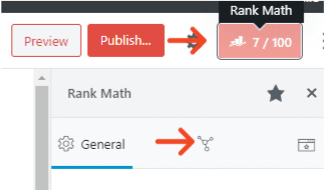
To edit it, you need to press the Rank Math icon (if you’re using the Rank Math plugin), then click the social media tab that appears below.
A new window will open up and you can write your text down in de description section. If you write the text in the description of the general tab, it will automatically appear in the social tab. But always double-check if it is correct in both places.
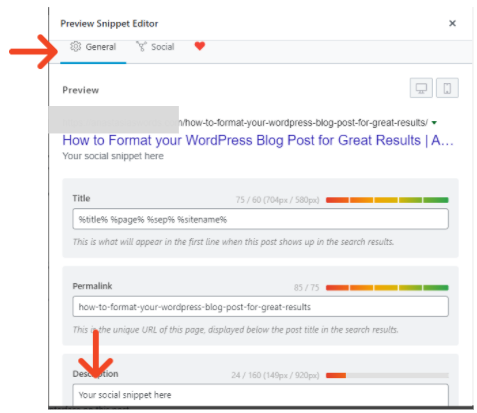
To place a different featured image for your social media post, go to the social tab and scroll down. There you’ll see a tab ‘add image’.
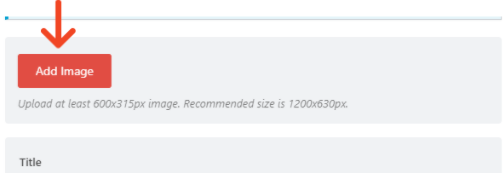
The place to edit your social media snippet and image might differ based on which SEO plugin you’re using. This information is based on the Rank Math plugin. If you’re using Yoast SEO, the social snippet section is found at the bottom of your blog post.
Choosing a Category
Placing each blog under the relevant category helps organize your blog, helping readers find other relevant content easier.
It also makes clear what your blog is about and what people can find on your website.
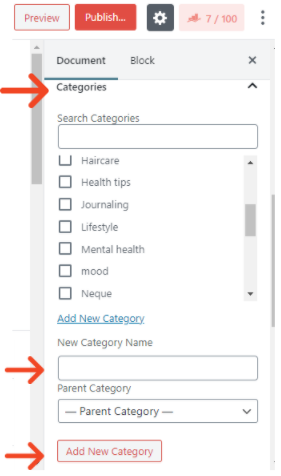
To choose your blog post category, scroll down in the settings section, as mentioned earlier, and select the relevant category for your blog post.
If you don’t see the category you want to choose, you can create a new category. Go to ‘new category name’, fill in the new category name, and then click ‘add new category’.
Creating a Table of Content in Your Blog Post
Another way to give your post an SEO boost is by having a table of content in your post. This also gives your audience a better overview of your blog post and results in a better user experience.
You can get a table of content by using a plugin that automatically creates the table of content based on your headings in the text.
You can use the plugin called Easy Table of Contents. You go to your plugins section, then select add new, search for the plugin you want to use, and then install and activate it. After that, you’re all set for your table of content in every post.


If you want to change your settings, you can always go to the plugin in your plugin section and press settings below that plugin.
Publishing Your Blog Post
When you’re done with your blog post, you simply press the publish button, which is in the right top corner. You will get a question if you are ready to publish. You can check certain aspects before publishing.
If everything is correct, you can press the publish button again, and your post goes live.
Editing a Published Blog Post in WordPress
If you have already published your post and you want to edit it. You need to go to your blog posts and click on the edit option under that blog post. The blog post will then open up.
After you have edited your post, you need to press update, and your changes are live.

Conclusion
And that’s a wrap. These are the essential steps when formatting your blog post in WordPress. I hope these instructions are helpful and that you can start formatting your blog post in WordPress to get some great results.
Remember that it takes time to figure out blogging and that you will make mistakes. Important is that you keep learning and keep researching. Nobody is an expert from day one.
Good luck with your great blog posts!
If you have any other tips for formatting the blog posts or questions, I’d love to read them in the comments!

Lucille van Ommeren-Kerman is a freelance writer for hire, self-published author, and Pinterest manager. She loves creating page-turning stories, giving personal development tips, and helping people grow their small businesses and blogs. When she isn’t writing or helping small business owners and bloggers grow their online traffic, you can find her spending quality time with her husband and family, reading a book, or watching a movie. You can follow her on Instagram or read some of her blogs on her website.
Tara Reid is a multi-passionate business and marketing strategist for introverted entrepreneurs who want to grow without relying on hustle culture or social media. With 18+ years of online business experience, she helps course creators, service providers, and digital product sellers build sustainable businesses through evergreen marketing, blogging, SEO, Pinterest, and email.
As the founder of the Introvertpreneur Club, Tara’s mission is to show heart-centered entrepreneurs that you don’t have to be loud to be successful. You just need the right strategies that fit your personality.
When she’s not supporting clients or creating new resources, you can find her at home in Canada with her three rescue dogs, a cup of coffee in hand, dreaming up her next project.
The Introvertpreneur Podcast
listen in to the top rated business podcast that is designed for introverted entrepreneurs who want to grow + scale in a more sustainable and fun way!
Top rated podcast
This one's on me. Complimentary free stuff coming right up.
leaving so soon?
Look behind the curtain and see exactly what I do every week, month, and quarter, to market my business without social media (in under 5 hours per week)!
The Quiet Marketing Playbook
Take this free quiz and learn what your superpower is as an entrepreneur. You'll also get a curated list of my best resources and tips for using your superpower to your advantage!
What's your Introverted Superpower?
Best Free Resources:
dig into 'em now!
A business strategist and marketing coach who focuses on helping course creators, coaches, and service providers, build sustainable businesses without social media.
